How to Take Ownership of a Folder or File in Windows 10
If you don't want to invest in third-party software, try using File Explorer
- Access to specific Windows 10 files or folders require administrator access, also called owner access.
- Therefore, in order to modify them, you need to take ownership of them.
- You can take ownership via File Explorer or with third-party tools, as described in the guide below.
In order to access any file or folder on Windows 10, you have to have the appropriate privileges. Unfortunately, certain issues can occur if you don’t have the privilege to edit certain files and folders, and this is when you have to take ownership of that folder or file.
Taking ownership of a certain folder isn’t that complex, and today we’re going to show you how to do it.
How do I take ownership of a file or folder?
1. Right-click the folder you want to gain access to and choose Properties from the menu that opens.
2. When the Properties window opens, navigate to Security tab. In the group or user name section you can see the list of users and groups on your computer that can access this folder.
3. Click the Advanced button.

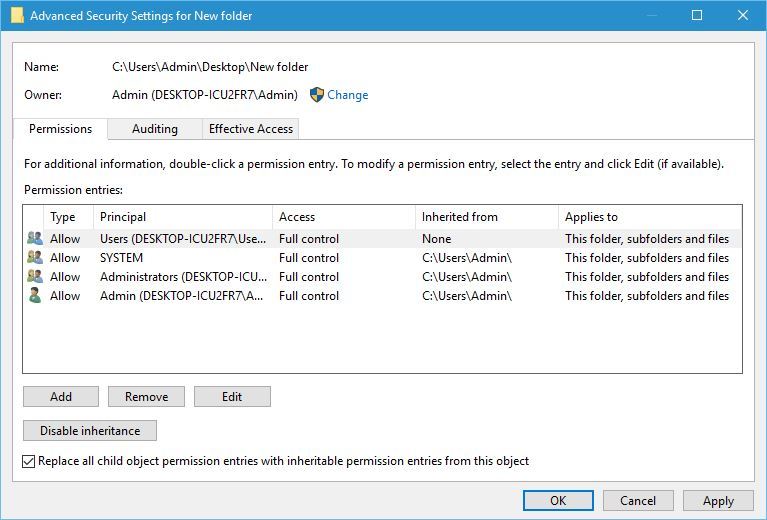
4. When the Advanced Security Settings window opens, check the Owner section at the top.
5. Click Change in order to modify the owner of the folder.
6. Select User or Group window will now open. Click on Advanced.
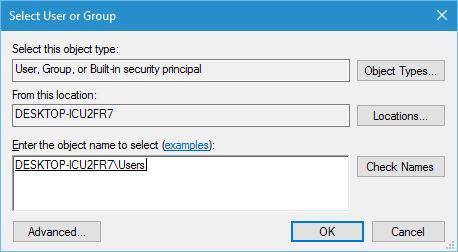
If you know the name of the group or the user, you can just enter it in the Enter the object name to select section and click Check Names and OK and skip to step 9.
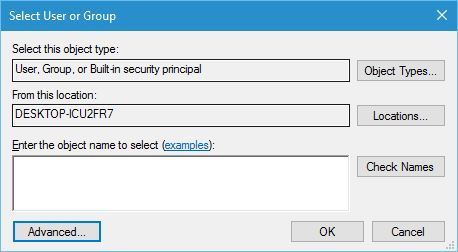
7. Click Find Now button and the list of all groups and users on your computer should appear in Search results.
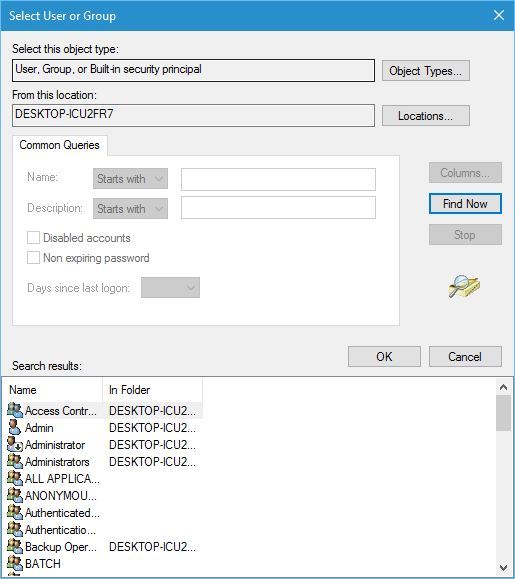
8. Select the name or the group from the list and click OK. In our example we selected Users group, but you may select a group or a user that you wish to assign ownership to.
9. Click OK again.
10. Check Replace owner on subcontainers and objects to change the owner for all subfolders in this folder.
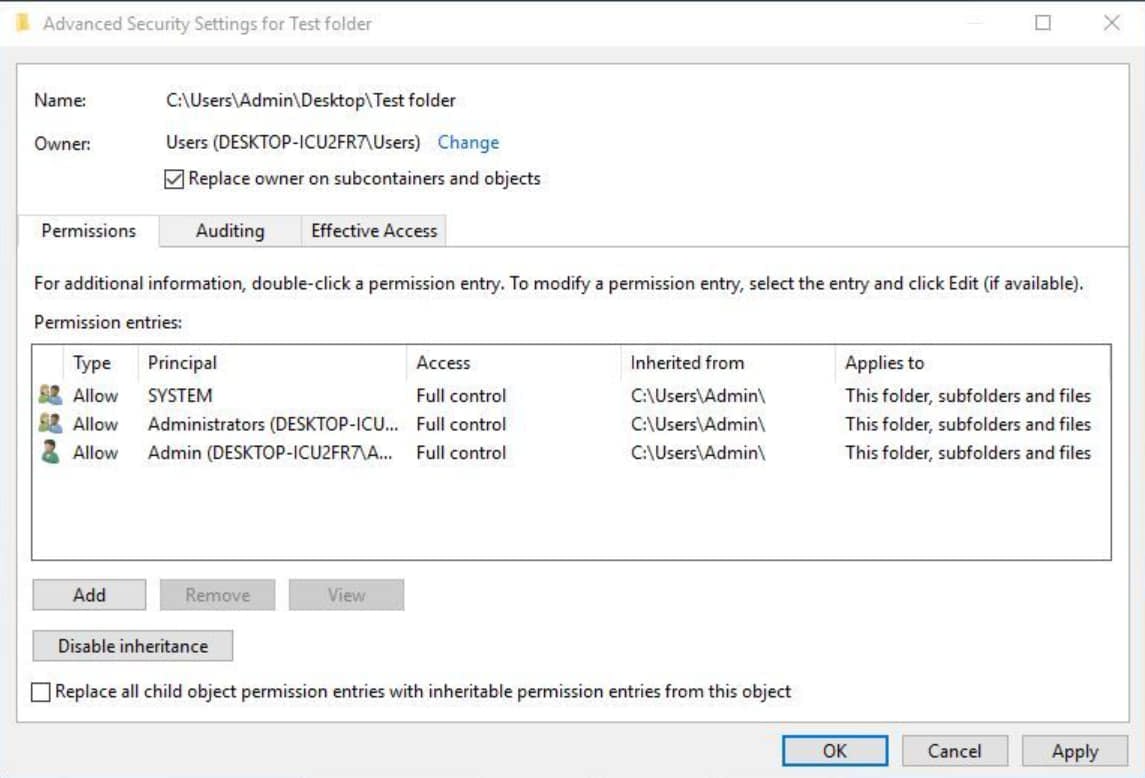
11. Select Apply and OK to save changes.
Certain issues on Windows 10 might require you to take ownership of a file or folder on Windows 10. When you have ownership of it, you can modify it however you want.
What to do to gain full control over a folder?
Now you have taken ownership of the folder, but you might not have full control over it, meaning that you cannot make any changes such as modifying the files or folders. To change that, do the following:
- Right-click the same folder and choose Properties. Go to the Security tab and click the Advanced button.
- When the Advanced Security Settings window opens, click the Add button.
- Now click Select a principal link.
- You should see a familiar Select User or Group window. Enter a user name or a group name in Enter the object name to select section. If you don’t know the name of the user or a group, click the Advanced button and go to the next step.
- Click Find Now and select the user or a group from the list of search results. Click OK.
- Click OK again.
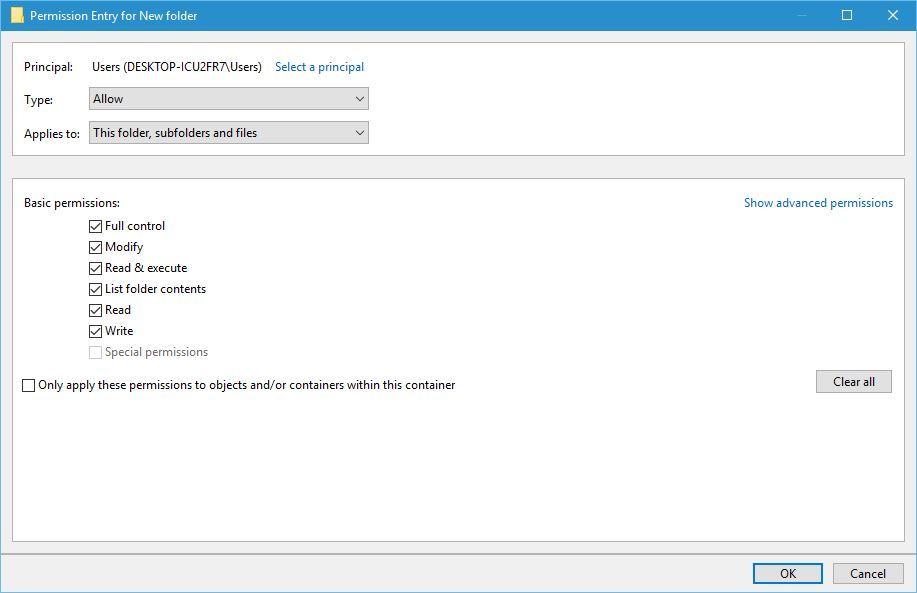
- Set Type to Allow and Applies to This folder, subfolders, and files.
- In the Basic permissions section check Full control and click OK.
- Select the newly added principal and check Replace all child permissions entries at the bottom.
- Click Apply and OK to save changes.
Alternatively, you can use third-party solutions such as TakeOwnershipEx to take ownership over a certain file or folder. To do that, you can do the following:
- Download TakeOwnershipEx.
- Start TakeOwnershipEx-1.2.0.1-Win8.exe.
- After you’ve installed the program, run it.
- Click the Take Ownership button and select a folder.
- Optional: If you wish you can also restore ownership to a folder by clicking the Restore Ownership button.
Taking ownership over a folder isn’t as hard as it seems, and sometimes you might have to take ownership of a certain file or folder or even a registry key in order to fix a problem on Windows 10.
We hope that our little guide was useful to you and that you can now easily take ownership of certain files and folders.
If you have any questions or know another way to take ownership of a file or a folder, tell us in the comments section below and we will be sure to check them out.


