Epson Printer Error 1131: What Is It & How to Fix it
Epson printer error 1131 is usually caused by malfunctioning drivers
- The Epson printer error 1131 occurs if the driver is corrupt or incompatible with your system.
- Running the Printer troubleshooter and updating the driver should fix the problem.
- You might also consider that an older printer software is conflicting with the new one.
Epson printers are very good but some of our readers reported the Epson printer error 1131 or Epson printer utility setup error 1131 out of the blue. It’s needless to say that the printer is unusable at this point but in this article, we will help you fix the problem immediately.
Why do I get the Epson printer error 1131?
It’s essential to understand why is the Epson printer returning the error 1131, and here are the main causes for this problem:
- Corrupted or incompatible driver – Sometimes, due to crashes or other unfortunate events, the printer driver may get corrupted. An incompatible driver can also cause the Epson printer error 1131.
- Installation problem – Ensure you follow the exact instructions from Epson when installing the printer. Otherwise, these kinds of problems may occur.
- Corrupt files – If some system files or the ones from the Epson printer software are missing or corrupted, this is most likely causing an Epson printer error 1131.
- Incorrect configuration – If the printer is not set up correctly, it can cause a number of errors like this one.
- Malware or virus infection – A PC infection can mess up everything on your PC, including the printer software. Use one of the best antiviruses to run a full scan on your machine.
Now that we know what we’re dealing with, let’s go to the actual solutions to fix the problem.
How can I fix the Epson printer error 1131?
Before going into more complicated tasks, let’s run a few quick solutions that might fix the problem quickly:
- Install all Windows pending updates.
- Turn off your printer and your PC, disconnect the power and data cables, and wait for 30 seconds. Power your PC, reconnect the cables, and power your printer to see if the error still occurs.
- Restart your PC. Although it seems futile, it might help.
1. Run the Printer troubleshooter
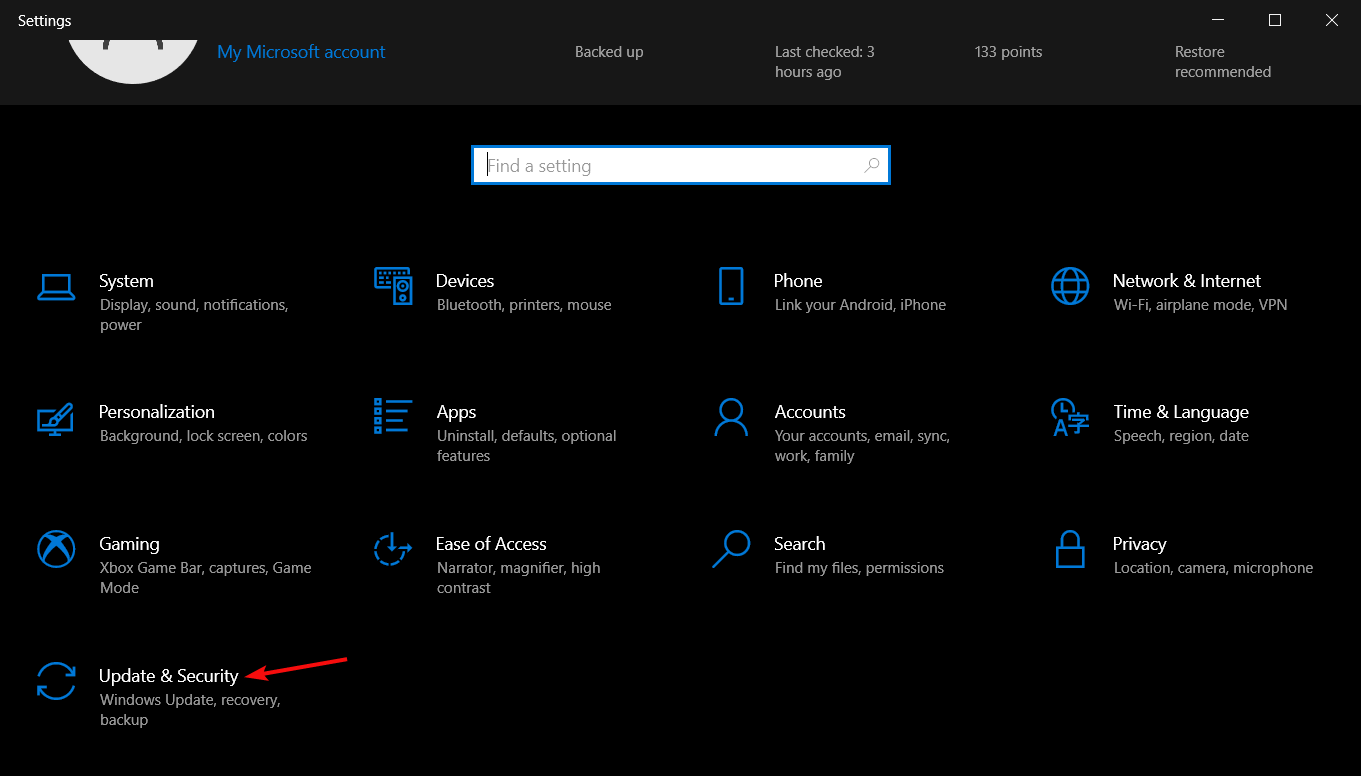
- Click the Start button and select Settings.
- Select Update & Security.
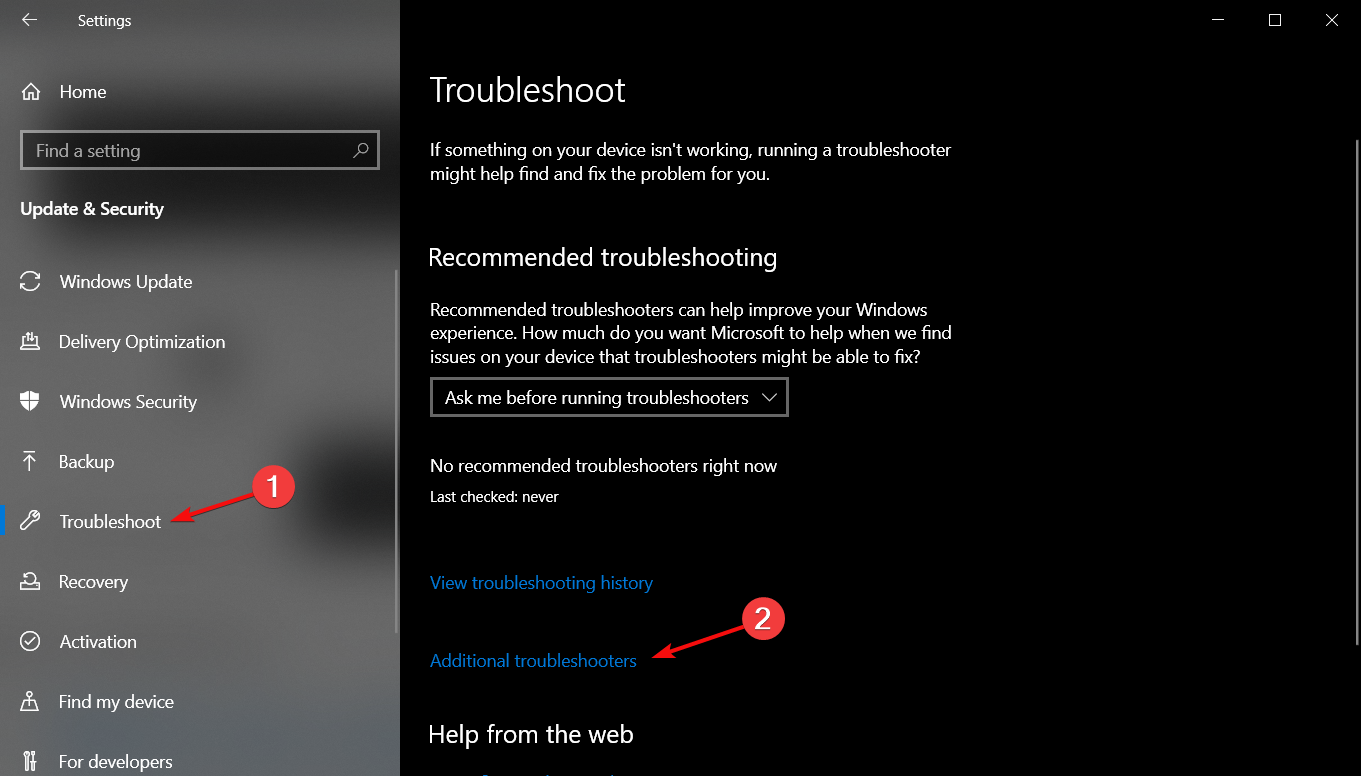
- Now, choose Troubleshoot from the left pane and click on Additional troubleshooters from the right.
- Select the Printer option and click on Run the troubleshooter button.
- Follow the on-screen instructions to carry out the troubleshooting process.
If Windows cannot connect to the printer, this guide will help you solve this problem as well.
2. Update the printer driver
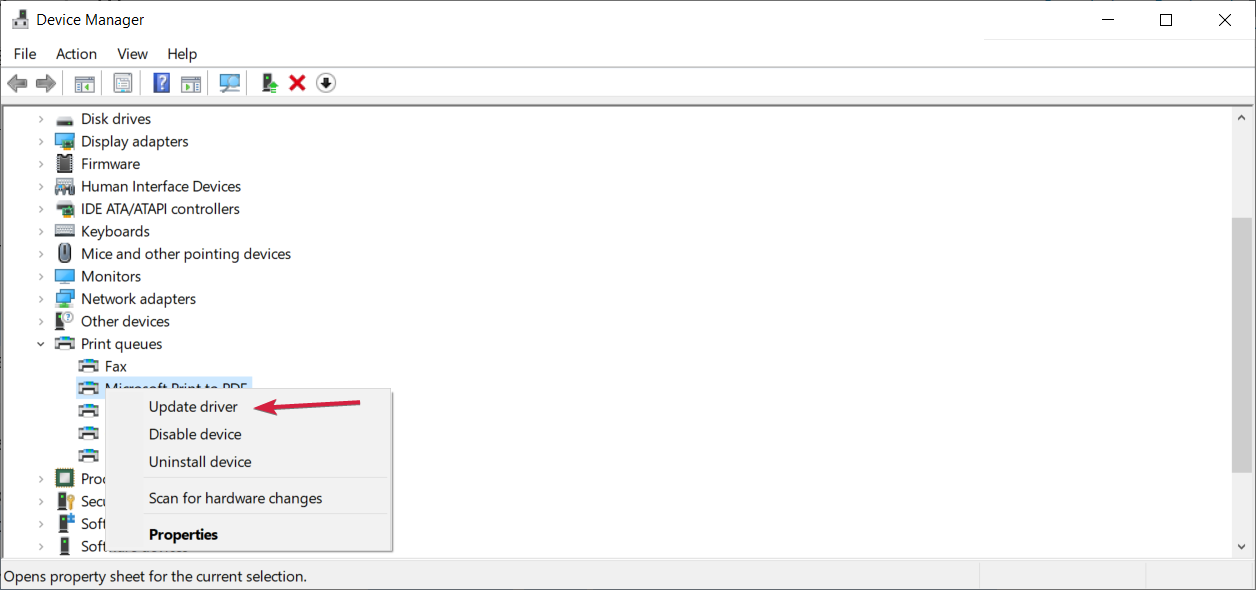
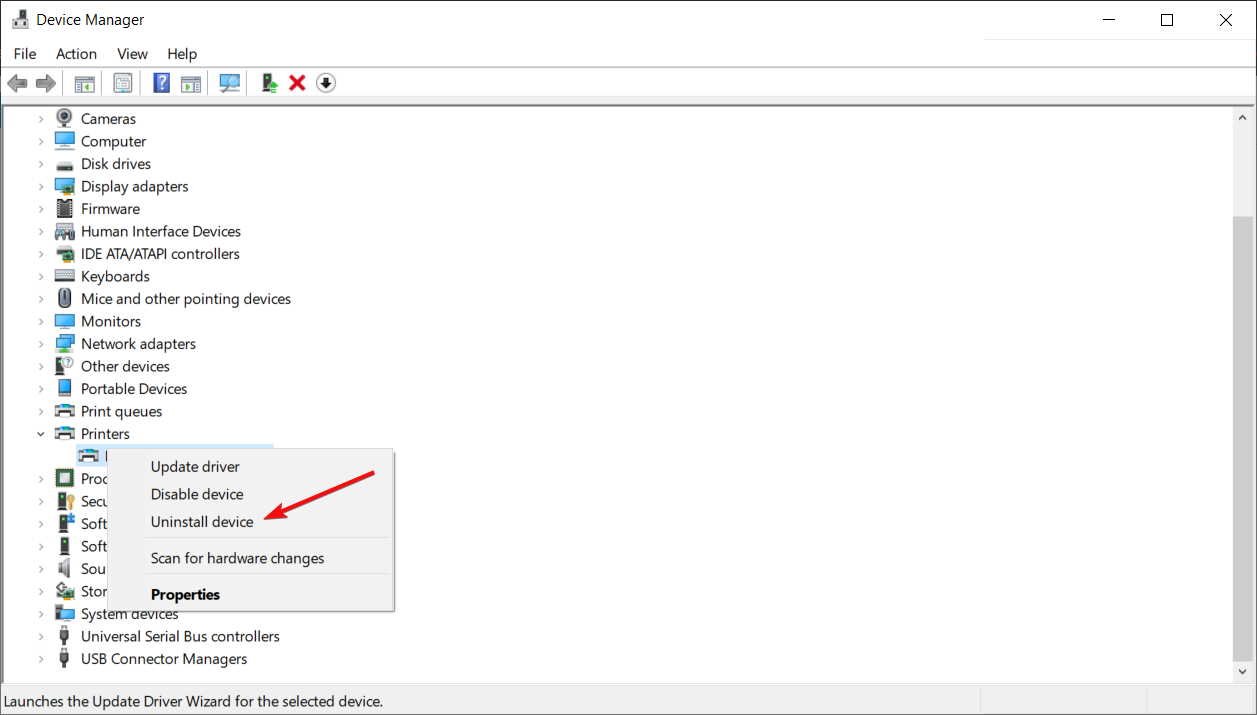
- Right-click the Start button and select Device Manager.
- Click on the Printers section to expand it, right-click your Epson printer, and select Update driver.
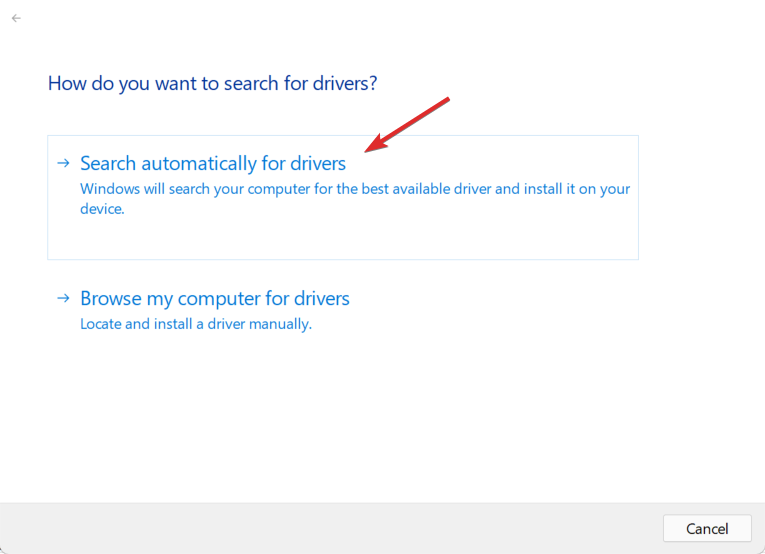
- Click on Search automatically for drivers.
- The system will look for a driver update and install a new one if it finds it.
- If this doesn’t work, repeat step 1 and choose Uninstall device in step 2 to uninstall the driver.
- Restart your PC and the system will automatically detect the printer and install a driver for it.
Most printers, including the ones from Epson, usually come with media that contains software and drivers for the device.
You may also try to use the media to reinstall the printer software right after you uninstall the device in step 5.
If you don’t have the media anymore, you can visit the Epson Support page, specify the model of your printer and get the correct driver and software for your OS.
In case you want to rely on an automated method, you can use third-party software because it will find the latest update for your printer driver immediately.

Outbyte Driver Updater
Update your printer driver with the newest version from Outbyte Driver Updater’s massive database.3. Run SFC and DISM scans
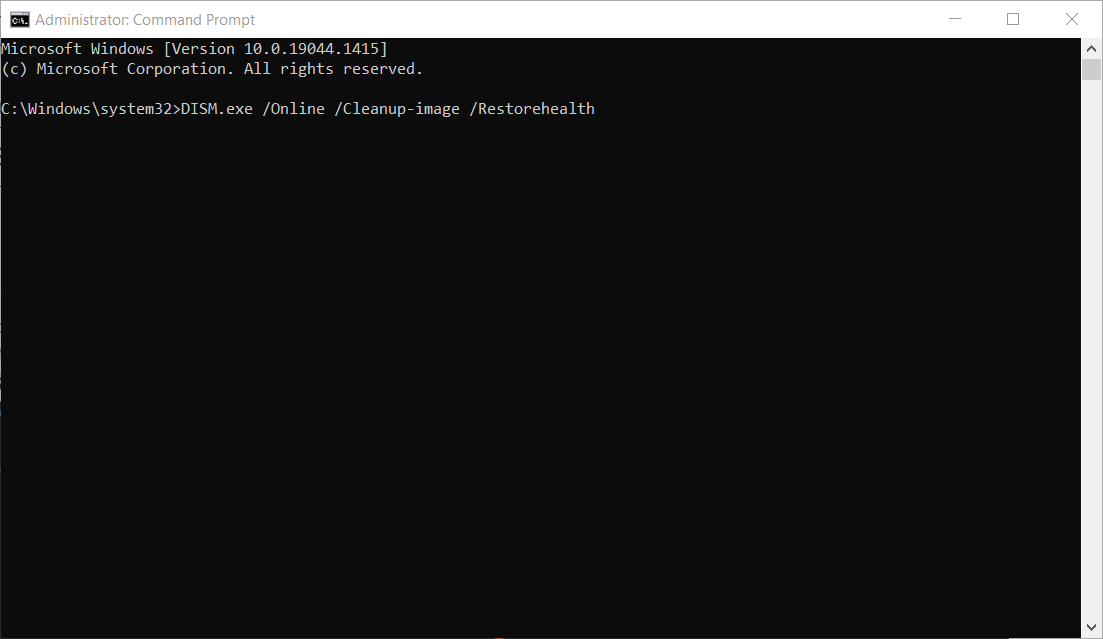
- Click the Windows button, type cmd, and select Run as administrator to start Command Prompt with full privileges.
- Type or paste the following command and press Enter to run it:
sfc /scannow - System File Checker will scan your system files and repair them.
- After completing the scan, type or paste the following command and press Enter:
DISM.exe /Online /Cleanup-Image /Restorehealth - Wait for the DISM tool to complete the scan, then close the window and restart your PC.
If the Epson printer error 1131 is caused by file corruption, the SFC and DISM scans should repair them, and the situation should return to normal.
We also have a complete guide on what to do if System File Checker is not working if you stumbled on that problem.
4. Uninstall all other printer software
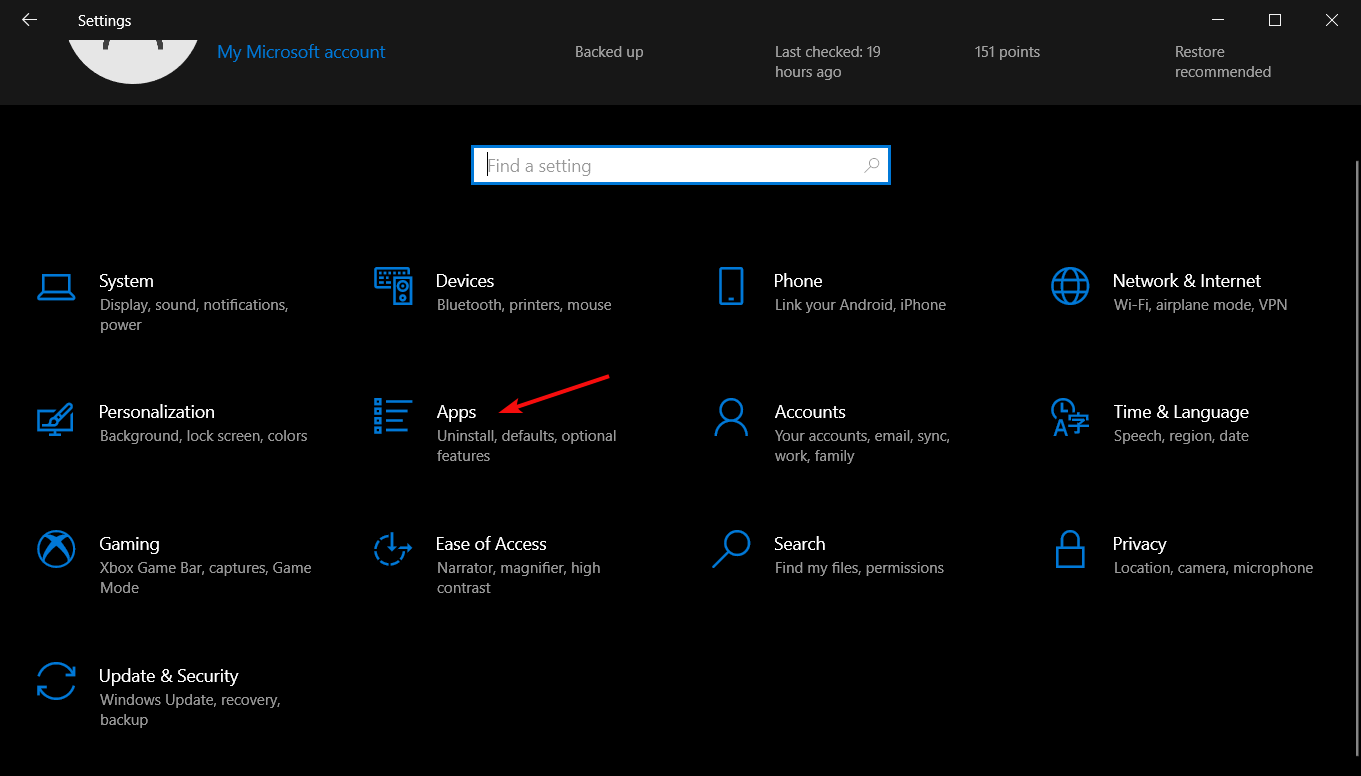
- Click the Start button and select Settings.
- Now, choose Apps.
- Look for any previous printer software, click on it, and select Uninstall.
- After you uninstall all printer software, reinstall your printer again, according to the indications from the Epson printer manual.
If you previously had a different printer from Epson or any other brand, its software might be conflicting with the new one.
Uninstalling all other printer software may fix the Epson printer utility setup error 1131 immediately, so try it out.
Here we conclude our article hoping that our solutions helped you fix the Epson printer error 1131, and now it’s working fine.
We also recommend consulting our guide on what to do if the Epson printer is not printing because it might bring additional information.
If you have any questions or possible working solutions, don’t hesitate to write them down in the comments section below.
