FIXED: Winload.exe Missing Error in Windows 10
Solve any winload.exe issue on your Windows 10
- Winload.exe issues are pretty severe since they inadvertently lead to you not being able to properly boot your PC, and therefore cannot access your data.
- We will be covering several simple methods on how to fix Winload.exe issues in the article below in a way that is extremely easy to understand.
- This article is part of a much larger hub that we have that is dedicated towards Boot errors and how to efficiently fix them.
- For more useful articles, visit our dedicated BOOTMGR section.

Are you having problems with your Windows 10 OS? If you can’t properly boot your device or if you are noticing issues with the winload.exe protocol (winload.exe is missing or winload.exe is corrupt) then we recommend you use the troubleshooting steps below in order to address these problems with ease.
Winload.exe is in fact what we know as Windows Boot Loader, a small program built on the Windows 10 system. Winload.exe is initiated by another protocol, BOOTMGR which is the boot manager featured in Windows 10, Windows 8, Windows 7, and Windows Vista.
Now, winload.exe will load some files from Windows, files that are quite important for your device. Because of that, if winload.exe is corrupt or missing you will not be able to properly use your Windows 10-based tablet, laptop, or desktop.
So, due for the same reasons, you should use the troubleshooting solution below in order to safely fix this problem.
How can I fix Winload.exe in Windows 10:
1. Use Startup Repair
- Make sure you can use your Windows 10 installer DVD.
- So, insert the bootable DVD on your device and restart the PC.
- When prompted press any key in order to boot from DVD.
- Wait while the Windows installation files are being uploaded.
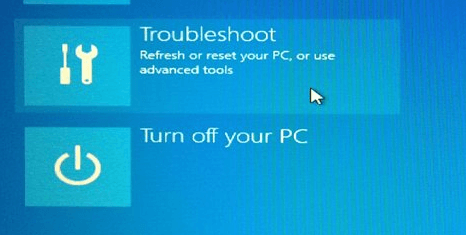
- Then from the main menu of your installer disk choose Troubleshoot.
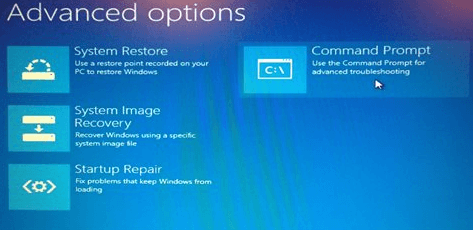
- Up next from the System Recovery Options select Command Prompt.
- A cmd window will be displayed on your screen; there type bootrec /rebuildbcd and press enter from your keyboard.
- Wait while the command is being executed.
- Then on cmd type exit and press enter.
- Reject the DVD and reboot your Windows 10 device as you are done.
The Boot Configuration Data file is missing? Don’t panic, we’ve got a dedicated guide about that. Check it out and solve the issue in no time.
For being able to fix winload.exe you need to rebuild the Boot Configuration Data protocol, dubbed as BCD. This protocol is telling to your Windows device how to start the boot sequence and contains essential boot configuration options.
2. Remove the Windows.old folder
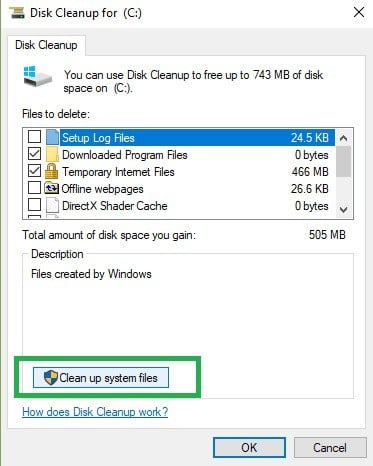
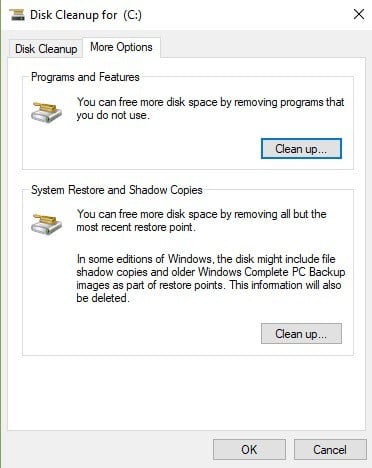
1. Type Disk Cleanup > select your C drive > select Clean up system files
2. Wait for the utility to calculate how much space it can free up > on the new windows, click on the “More options” tab
3. Go to System Restores and Shadow copies > hit Clean up
Problems deleting all your junk files? Follow this guide to solve Disk Cleanup issues and save your drive.
The Windows.old folder may also cause various .exe file errors. As a quick reminder, the Windows.old folder appears when you upgrade your Windows version or perform a clean install of Windows 10.
The role of this folder is to keep your previous Windows installation files, allowing you to restore it. Here’s how to remove the Windows.old folder:
3. Reinstall Windows 10
If the two solutions listed above didn’t help you fix Winload.exe bugs on Windows 10, try reinstalling the OS.
That’s it: you have resolved the winload.exe problem from your Windows 10 device.
If you need further Windows 10 tips or troubleshooting solutions, don’t hesitate and use our tutorials, or use the comments field below for sharing your questions with our team.
If you’ve got additional tips and suggestions on how to fix Winload.exe issues in Windows 10, you can list them in the comments below.
Still experiencing issues?
SPONSORED
If the above suggestions have not solved your problem, your computer may experience more severe Windows troubles. We suggest choosing an all-in-one solution like Fortect to fix problems efficiently. After installation, just click the View&Fix button and then press Start Repair.
